With more consumers owning more computers, tablets, smartphones, and other electronic devices, it is no longer practical to keep all your files in one computer that you can’t bring with you wherever you go. Cloud technologies have been developed to be more and more mature. Google Drive, OneDrive, something like that, which offer users hosting on various files like video, music, images, etc. have gained a vast range of favor over the world. All the stored data and files will be totally safe and at your disposal. What’s more important, the database automatically scales with your need. For whatever reason that you want your DVD collection in digital files, mine is that I can store those files on a server and stream them anytime, from anywhere. If you’re one of those people looking to take the jump into the cloud but don’t know How to upload DVD Movies to Dropbox, OneDrive, Google Drive, here’s a top solution about rip and convert DVD library in Dropbox, Google Drive, OneDrive etc easily and quickly. 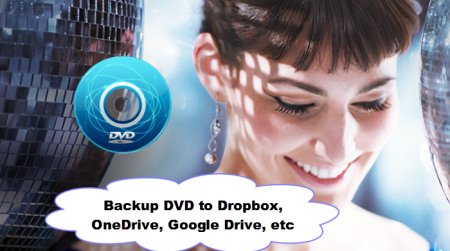 As you know, Dropbox, Google Drive, OneDrive and other Cloud doesn’t support DVD video format. If you have some nice DVD movies and want to add to Dropbox, Google Drive, OneDrive etc for streaming and playback on iPhone, iPad, Android, Surface 3, BlackBerry, Plex, PS4/3, PSP, PS Vita, WDTV, smart TV and more media devices, you have to rip and copy DVD to Dropbox readable formats, as MP4, MOV, etc. To do so, a DVD ripping software is essential. Here Pavtub DVDAid is recommended to you. This DVD ripping tool can rip any encrypted DVD and convert DVD to Dropbox readable MP4, MOV etc. formats as well as other popular formats, like rip DVD to AVI, MKV, M3U8, H.265, WMV, MPG, FLV, SWF, M4V, etc. on Windows (including Windows 10, 8.1 and 8). For the video size limit of Dropbox, OneDrive, Google Drive, etc site, the built-in editor also allows you to extract DVD clips with the very part you want. Or, you can just choose to rip certain chapters of a DVD as you like. Note: If you are a Mac user, please turn to DVDAid for Mac, support Mac OS X El Capitan, Yosemite 10.10, 10.9 Mavericks, 10.8 Mountain Lion, 10.7 Lion, Snow Leopard10.6, Leopard 10.5. Now download the right version of the program and follow the guide below.

 Other Download- Pavtube old official address:http://www.pavtube.cn/dvd_ripper/- Cnet Download:http://download.cnet.com/Pavtube-DVDAid/3000-7970_4-76158510.htmlPart I: How to rip DVD to Dropbox, OneDrive, Google Drive, etc in readable video format for uploading? Step 1. Load DVD movies Insert the DVD disc into your computer’s DVD drive and run DVD Ripper. You can click the “Load DVD” button to load the DVD files to the program. DVD ISO/IFO, VIDEO_TS folder are supported also.
 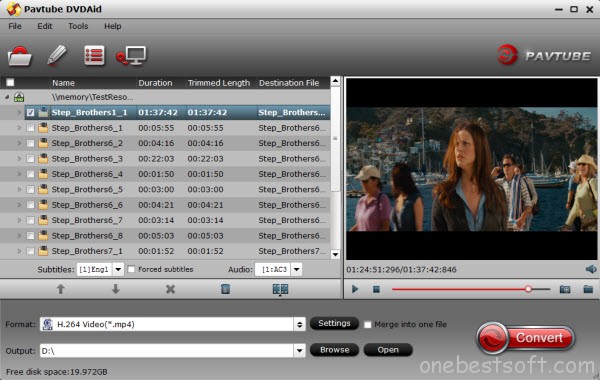 Step 2. Specify output format As has been stated above, Dropbox, OneDrive, Google Drive, etc supports MP4, etc video files. So you can just select “Common Video” > “H.264 Video(*.mp4)” as the output video format. Also you can transfer your DVD to media hub, Cloud Storage and External Hard Drive/Thumb Drive, Flash drive, Plex for storage and playback.
 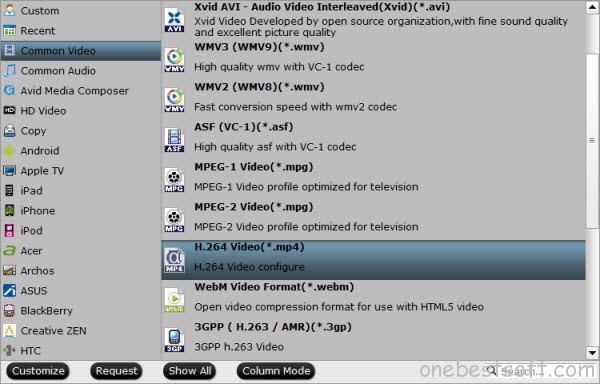 Step 3. Trim/Edit DVD files A. Since Dropbox, OneDrive, Google Drive, etc has limitations about the uploading video size(If you only have the free account, you only have 2 GB of space), please pay attention to the video size when ripping DVD movies for Dropbox, OneDrive, Google Drive, etc. Here we should highlight the trim function on this software. B. Just click “Edit” to trim the DVD videos to get the very part you want. Besides trimming, cropping, adding watermark, adjusting special effect, are well supported as well. Step 4. Start converting DVD to Dropbox, OneDrive, Google Drive, etc When all these settings are ready, you can click the “Convert” button to begin the DVD to Dropbox, OneDrive, Google Drive, etc conversion. When the ripping is done, you can click on “Open” button to locate the ripped videos. Tip: You can learn other tips about >> how to Compress your video files to save space on Dropbox. Part II. How to Upload the ripped DVD movies to Dropbox for storage? Here, Set Dropbox as an example, detailed guide about how to sync DVD Movies to Dropbox are shared as follows: 1. Sign in to the Dropbox website. 2. Click the Upload button from the very top of the window. The upload button. 3. A window will appear. Click the Choose File button and then select the file on your computer that you’d like to add to your Dropbox. 4. Choose as many files as you like, and then click the Start Upload button. 5. The window will disappear, your files will start uploading, and you’ll be shown a progress indicator. That’s it, you’ve added files to your Dropbox! Detailed steps can be found here. That’s the process of copying DVDs to Google Drive, One Drive and iCloud Drive, really simple, right? With Pavtube, even if your smart phone is not along with you when you make backup of your DVD Movies, you can also view the backed up video by accessing the synced videos stored on Google Drive,One Drive or Dropbox with your phone. Wish you every beautiful day! More How to Upload MKV to Facebook Successfully? HEVC Converter: Enable h.265 playback capability on my DS415+ running Plex Why The iPhone 6 Will Be The Device Of The Year? Watch DVD VOB files on Galaxy TabPro 8.4 with best video settings Convert VOB Files to Apple TV with Apple TV Mac Video Converter Play Blu-rays with Amazon Fire TV via Plex iTunes to PS Vita – How to use iTunes with PS Vita Stream stored movies on a USB stick to Roku 3 for playback Src Backup DVD to Dropbox, OneDrive, Google Drive
You may find this commen questions you have met: “ If your talking about music then just take your items from your itunes music songs from your itunes library and drag them to the playstation vita music folder. For movies and tv shows from itunes WONT happen because the vita does not support the type of format the movie is (I think SONY is still pissed from Apple throwing SONY into the dirt after the creation of the iPod) For pictures you just go to Start, computer, the picture library, and just drag your items to the PS vita pictures folder. So, How to use itunes with ps vita?”  Hot Search: Comparison: iTunes HD vs SD Movies | PS4 Column | Blu-ray to PS4 | DVD to PS4 |4K to Xbox One | If you are also a movie fan and got one PS Vita, below content will be helpful to you about solve the “iTunes Movies to PS Vita” issues. Generally speaking, iTunes purchased content is for Apple’s devices, such as iPad, iPod, iPhone. Because Apple use DRM protection to prevent it’s stuff from being played on any non-Apple media devices. If you want to For playing iTunes DRMed media on PS Vita, you have to remove the DRM protection from iTunes movies and convert M4V to a format that the PS Vita will accept. Now you may follow the step-by-step guide below to learn how to enjoy iTunes songs/movies on PS Vita. Here we recommend you try Pavtube ChewTune (Read Review) which comes as the best iTunes M4V to PS Vita Converter which can convert iTunes M4V to various video formats for playing on plenty of devices including PS Vita so that your PS Vita can work with movies or television shows purchased or rented from the iTunes Store like iPhone, iPad, iPod, Apple TV does. Tutorial about How to Convert purchased or rented iTunes movies or TV shows to PS Vita Free download best iTunes M4V to PS Vita Converter:
  How to Remove DRM-protection from iTunes movie to PS Vita? Step 1. Run Pavtube ChewTune, drag and drop the source iTunes video and music from local computer to ChewTune. Or hit the “Add Video” button to import your iTunes DRM contents.
  Step 2. From “Format” drop-down list, choose “Common Video > H.264 Video(*.mp4)” as the output format.
 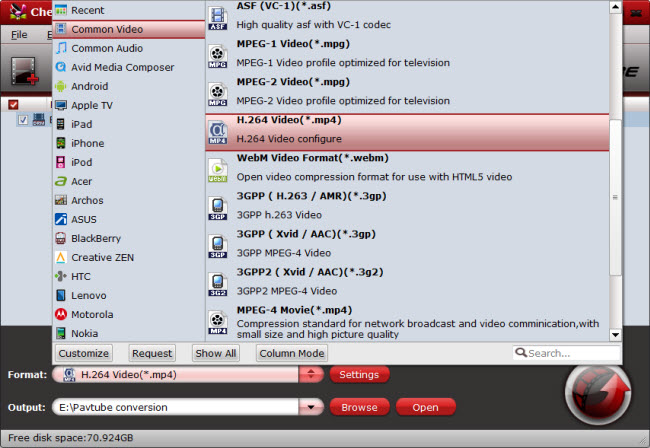 Step 3. If you like, you can enter “Settings” option to adjust profile parameters, such as video codec, bitrate, frame rate, size, etc to get better video and audio quality on PS Vita. Step 4. Click the big “Convert” button on software main UI to start iTunes videos and music to PS Vita conversion. This converter will activate your media player automatically and start to play this video. The player windows cannot be removed or closed. After the conversion, click “Open output folder” to quick locate the converted video and copy movies to mobile HDD and connect it to the PS Vita from PC/Mac. Now you are ready to watch DRM-free videos from iTune store on PS Vita with high video quality. Learn>> How to Transfer Music / Songs to Your PS Vita. Additional Tip: Get Pavtube ChewTune in bundle package: Video Converter Ultimate($65) + ChewTune($29)with Only $74.9 which can save you $19.1, then you can enjoy any DRM or common movies freely on Windows 7/Vista/XP/8/8.1. (Read Pavtube Video Converter Ultimate Review). More Creating 3D Blu-ray movies to view in Oculus Rift DK2 via Mac El Capitan How to Stream and Play Video_TS files via Apple TV 3 Play 4K/HD Videos and Movies to Surface Hub Tablet on Windows 10 Compress Audio files for Saving Space on Your Computer/Device/Web Convert 3D Blu-ray to SBS MKV into hard drive and playback via Plex Convert and Play downloaded 3D Movies on 3D TV Enjoy 3D MKV movies on Smart TV/LED TV/LCD TV via USB Src Share iTunes Movies to PS Vita for Playback
With Pavtube Blu-ray/DVD/Video tools in hand, you will get no difficulty to make a full disc copy or the main movie copy of the original 2D/3D Blu-ray/DVD disc. Besides that, the program also enables you to rip/convert Blu-ray/DVD disc to various different file format for playing on iPhone/iPad/iPod, Android phone and tablets, Windows phones or tablets, game consoles, HD media players, streaming to Apple TV/Amazon Fire TV/Roku, etc. All of Pavtube Mac version Blu-ray/DVD/Video tools have updated to support the newest Mac OS X El Capitan systems. Good News for DVD/Blu-ray/Video collector!! Pavtube announced an official 2015 Christmas Promotion of its all Blu-ray/DVD/Video Tools for All Facebook Fans. 50% Discount Coupon! Time-Limited! Rush to Buy! Reportedly 5 to 6 times faster than a boatload of its competitors, this Windows-based program is eating up a bigger market share. For video editing amateur, you can effectively convert virtually any file formats including AVI, WMV, MP4, MOV, FLV, VOB, MKV, MKV, MTS, M2TS, Tivo, H.265 in SD, HD, 2K, 4K videos to your desired file formats to import your source video to any popular video editing tool. For camera and camcorder users, you will have a fast and fluid workflow with our program by exporting professional video editing codec such as Apple Prores Codec for Final Cut Pro 6/7/x, Apple Intermediate Codec(AIC) for iMovie/Final Cut Express, DNxHD MOV for Avid Media Composer, After Effects CC/Adobe Premiere Pro/Adobe Premiere Elements/Sony Vegas specially optimized file formats, etc. Tip 1. To reach out to Pavtube's more Christmas Coupons, please go to http://www.multipelife.com/pavtube-2015-christmas-great-promotions Tip 2. There are four main Pavtube products: BDMagic, ByteCopy, DVDAid, Video Converter Ultimate. As their names suggest, they are designed for different purposes. Here is a brief form for you to make the right purchasing choice: Pavtube Softwares Comparison Tip 3. To go deeper in user experience, Pavtube Facebook will offer more coupons with different softwares in future. The list are as follows: Pavtube Facebook Round 1: 50% OFF ByteCopy for All Facebook Fans, Days Pavtube Facebook Round 2: 60% OFF DVD Ripper & Copier on Dec 21, 2015, Only 2 Day Pavtube Facebook Round 3: 50% OFF 50% OFF Video Converter Ultimate/iMedia Converter for Mac on Dec 23, 2015, Only 4 Day Pavtube Facebook Round 4: Only $9.9 Video Converter, HD Video Converter, MTS/M2TS Converter, MXF Converter, ChewTune, MKV Converter, FLV/F4V Converter, DVD Creator or MXF MultiMixer for Mac/Windows, on Dec 28, 2015, Only 3 Day Pavtube Facebook Round 5: 60% OFF BDMagic for Windows, 55% OFF BDMagic for Mac on Dec 31, 2015, Only 1 Day $9.9 Area: In the Christmas promotion, Pavtube also offers a $9.9 area in Facebook. Here, you can get a DVD Creator, Video Converter, MKV Converter, MXF Converter and some other video tools in $9.9. Constantly surprises, quickly order your favorite software to backup, edit and share your favorite Christmas movies, music, and videos. Time-Limited! Action! If you have any problem to buy or use Pavtube, pls feel free to contact dvdwinsupport@pavtube.com (for Windows BD/DVD rippers user), videowinsupport@pavtube.com (for Windows video converters user), dvdmacsupport@pavtube.com (for Mac BD/DVD ripper user), or videomacsupport@pavtube.com (for Mac video converter user). Learn more at https://www.facebook.com/pavtubefans/app/201742856511228/
This post will give you the easiest solution to rip Blu-ray, DVD and movies to PS3 for playing and streaming, especially for iPhone users who want to play video when they are on the bus or subway. The PS3 is a wonderful gaming system, for many users, it maybe annoying that you have collected wonderful Blu-rays, DVDs and 1080p HD Videos, but cannot save these movies on your PS3 hard drive for convenient playback on the go. Now I will give this tutorial to offer you the best bet to convert 1080p HD Video, DVD, Blu-ray Movies to PS3 for syncing. To transfer your Blu-ray/DVD and other movie on your PS3, all you need is downloading and installing the Pavtube Video Converter Ultimate (A professional Media Converter for PS3). Overall, this program can help you extract Blu-ray, DVD and convert movies to PS3 readable format. The Mac version is Pavtube iMedia Converter for Mac. Please follow the steps below to do your task. This program is capable of handling a wide rage of movie files, including commercial Blu-ray and DVD movies, Blu-ray ISO file, DVD IFO/ISO file, Blu-ray/DVD folder, camera footage (.MXF, AVCHD .MTS/.M2TS, .MOV, AVI…), TiVo recordings, and common video files in 1080p or 720p quality (MKV, MOV, AVI, VOB, etc.). It comes with optimal streaming media preset (1080p MP4) for PS3 as well as AVI preset with 5.1 audio output for you to take full use of surround sound system. Step 1. Run Pavtube Ultimate Media Converter for PS3 and import source media. Once run the software, click “Add Video” to load your video files like MTS/M2TS, MKV, MOV, TOD, TiVo, etc. The Converter is able to decrypt commercial Blu-ray discs and protected DVDs, all you need is to put Blu-ray disc/ DVD to BD drive, and click on “BD/DVD folder” to load the movie. 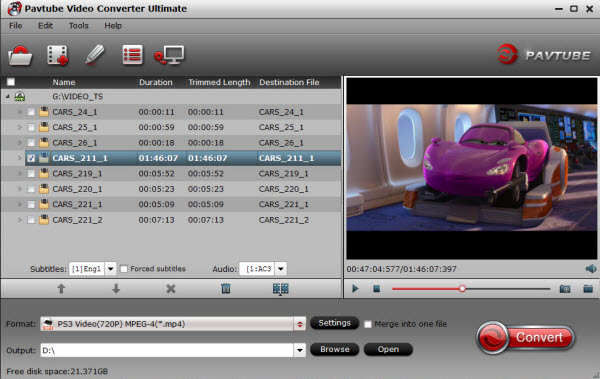 Step 2. Select desired episodes of the movie and set subtitle language. If your sources are video files, please skip this step. For BD/DVD/Video to PS3 conversion, you may set audio track and subtitles to desired language. In preview window you can observe the effect. Step 3. Set a PS3 streaming media format. Pavtube Video Converter Ultimate provides several presets for PS3. You can click on the pull down menu of “Format” to choose “PSP/PS3 > PS3 Video(720P) MPEG-4(*.mp4)“.
 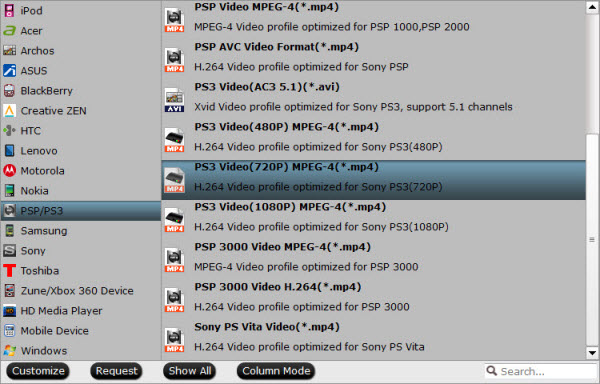 When ripping Blu-ray or converting 1080p movies, use “PS3 Video(1080P) MPEG-4(*.mp4)” to maintain best quality. To keep Dolby Digital 5.1 audio, choose “PS3 Video(AC3 5.1)(*.avi)” format. Step 4. Start converting 1080p HD Videos, Blu-ray/DVD movie to PS3 support video format. Now click “Convert” button to start ripping 1080p HD Videos or Blu-ray and DVD Movie to PS3. When the conversion task is finished, you can click “Open” button to get the final output files.
Use PS3 to play videos from local PC or streaming to your iPhone Sync Stream is a free app in the iTunes Store that enables iPhone streaming to the PS3. Just install it and open it up. That's really it. Turn on your PS3 on and you should see your iPhone in the video section. 1. Start your PS3. Move to the “Video” section. 2. Scroll down to “Search Media Servers.” After the search is done, a message will show the number of media servers it has found. It will find at least one, TV ersity. Click “OK” by pressing the “X” button on your controller to close the window. 3. Enter TVersity, you will now see a listing of all your shared files. If you chose the folder, press “X” to open it and view the videos inside. Select a video to watch and press the “X” button on the controller to stream the video from local PC hard drive. Now, You can enjoy 1080p HD Videos, DVD, Blu-ray Movies on your PS3 effortlessly. More How to Stream MKV Video to Chromecast for Playback Get started to Stream Video from PC to Roku using Plex Media Server Enjoy all high definition media contents on iPhone 6 Plus Painlessly Convert MKV, AVI, VOB, WMV, Tivo, MP4, FLV Video to iPhone 6 for Enjoying Play Rented 3D Movies with Apple TV on Mac OS X El Capitan Stream Videos from NAS to PS3 via DSLR for playback Which Budget Consumer Virtual Reality Headset Should You Buy? Convert and Play downloaded 3D Movies on 3D TV Src Convert Blu-ray, DVD and Movie for loading or playing on PS3
Good News for DVD/Blu-ray/Video collector!! Pavtube announced an official 2015 Christmas Promotion of its all Blu-ray/DVD/Video Tools for All Facebook Fans. 50% Discount Coupon! Time-Limited! Rush to Buy! Reportedly 5 to 6 times faster than a boatload of its competitors, this Windows-based program is eating up a bigger market share.  Copy and Backup Blu-ray/DVD With Pavtube Blu-ray/DVD/Video tools in hand, you will get no difficulty to make a full disc copy or the main movie copy of the original 2D/3D Blu-ray/DVD disc. Besides that, the program also enables you to rip/convert Blu-ray/DVD disc to various different file format for playing on iPhone/iPad/iPod, Android phone and tablets, Windows phones or tablets, game consoles, HD media players, streaming to Apple TV/Amazon Fire TV/Roku, etc. All of Pavtube Mac version Blu-ray/DVD/Video tools have updated to support the newest Mac OS X El Capitan systems. Play and edit videos For video editing amateur, you can effectively convert virtually any file formats including AVI, WMV, MP4, MOV, FLV, VOB, MKV, MKV, MTS, M2TS, Tivo, H.265 in SD, HD, 2K, 4K videos to your desired file formats to import your source video to any popular video editing tool. For camera and camcorder users, you will have a fast and fluid workflow with our program by exporting professional video editing codec such as Apple Prores Codec for Final Cut Pro 6/7/x, Apple Intermediate Codec(AIC) for iMovie/Final Cut Express, DNxHD MOV for Avid Media Composer, After Effects CC/Adobe Premiere Pro/Adobe Premiere Elements/Sony Vegas specially optimized file formats, etc. Tip 1. To reach out to Pavtube's more Christmas Coupons, please go to http://www.multipelife.com/pavtube-2015-christmas-great-promotions Tip 2. There are four main Pavtube products: BDMagic, ByteCopy, DVDAid, Video Converter Ultimate. As their names suggest, they are designed for different purposes. Here is a brief form for you to make the right purchasing choice: Pavtube Softwares Comparison Tip 3. To go deeper in user experience, Pavtube Facebook will offer more coupons with different softwares in future. The list are as follows: Pavtube Facebook Round 1: 50% OFF ByteCopy for All Facebook Fans, Days Pavtube Facebook Round 2: 60% OFF DVD Ripper & Copier on Dec 21, 2015, Only 2 Day Pavtube Facebook Round 3: 50% OFF 50% OFF Video Converter Ultimate/iMedia Converter for Mac on Dec 23, 2015, Only 4 Day Pavtube Facebook Round 4: Only $9.9 Video Converter, HD Video Converter, MTS/M2TS Converter, MXF Converter, ChewTune, MKV Converter, FLV/F4V Converter, DVD Creator or MXF MultiMixer for Mac/Windows, on Dec 28, 2015, Only 3 Day Pavtube Facebook Round 5: 60% OFF BDMagic for Windows, 55% OFF BDMagic for Mac on Dec 31, 2015, Only 1 Day Constantly surprises, quickly order your favorite software to backup, edit and share your favorite Christmas movies, music, and videos. Time-Limited! Action! If you have any problem to buy or use Pavtube, pls feel free to contact dvdwinsupport@pavtube.com (for Windows BD/DVD rippers user), videowinsupport@pavtube.com (for Windows video converters user), dvdmacsupport@pavtube.com (for Mac BD/DVD ripper user), or videomacsupport@pavtube.com (for Mac video converter user). Learn more at https://www.facebook.com/pavtubefans/app/201742856511228/
Good News for DVD collector!! Pavtube today announces an official start of DVDAid for Windows/Mac in the Round 2 phase of its Christmas promotion for All Facebook Fans. 60% Discount Coupon! Only 2 Day! Time-Limited! Rush to Buy! Reportedly 5 to 6 times faster than a boatload of its competitors, this Windows-based program is eating up a bigger market share.  Pavtube DVDAid provides the best solution to rip DVD and convert DVD to video and audio in popular file formats for many devices. Along with multiple practical bonus features like video editor, DVDAid is capable of improving your DVD movie experience without location or time limitations. It could backup DVD and convert DVD to various video and audio formats including M3U8, H.265/H.264 MP4, MKV, MOV, AVI, WMV, MP3, AAC, etc to let you enjoy DVD movies on any mobile device like iPhone 6S, iPhone 6S Plus, iPad Air 2, iPad Mini 4, Galaxy S6, Galaxy S6 Edge, Kindle Fire HDX, PS3, PSP, Surface, and more.
 (Only $14)
 (Only $14) What can Pavtube DVDAid give you? Learn More about Pavtube DVDAid on PC/Mac 1. Rip and copy any commercial and region-locked DVD to nearly all popular video/audio format, like M3U8, H.265, MP4, MKV, AVI, Apple ProRes, DivX, etc. 2. Makes 1:1 copy of original DVD Disc without quality loss with all audio streams, subtitle tracks, extras, etc. 3. Optimized preset for mainstream multimedia players: portable Apple, Android, Microsoft, Google and Sony devices, smart TVs, VR Headsets, Game Consoles, Media Player & Box Streamer, Storage & Server and more. 4. Specially designed formats included to be compatible with Mac video editing software: Apple ProRes, AIC, Avid DNxHD, MPEG-2, MOV, AVI, etc. for FCP X, iMovie, Avid Media Composer, Adobe Premiere Pro CC and more Non-linear editing system. 5. Full Compatible with Windows 10, Windows 8.1, Windows 8, Windows 7, Windows 2003/XP/Vista 6. Full Compatible with Mac OS X 10.11 El Capitan, Mac OS X 10.10 Yosemite, 10.9 Mavericks, 10.8 Mountain Lion, 10.7 Lion, 10.6 Snow Leopard, 10.5 Leopard Expire on Dec 23, 2015 Tip 1. To reach out to Pavtube's more Christmas Coupons, please go to http://www.multipelife.com/pavtube-2015-christmas-great-promotions Tip 2. There are four main Pavtube products: BDMagic, ByteCopy, DVDAid, Video Converter Ultimate. As their names suggest, they are designed for different purposes. Here is a brief form for you to make the right purchasing choice: Pavtube Softwares Comparison Tip 3. To go deeper in user experience, Pavtube Facebook will offer more coupons with different softwares in future. The list are as follows: Pavtube Facebook Round 3: 50% OFF 50% OFF Video Converter Ultimate/iMedia Converter for Mac on Dec 23, 2015, Only 4 Day Pavtube Facebook Round 4: Only $9.9 Video Converter, HD Video Converter, MTS/M2TS Converter, MXF Converter, ChewTune, MKV Converter, FLV/F4V Converter, DVD Creator or MXF MultiMixer for Mac/Windows, on Dec 28, 2015, Only 3 Day Pavtube Facebook Round 5: 60% OFF BDMagic for Windows, 55% OFF BDMagic for Mac on Dec 31, 2015, Only 1 Day Constantly surprises, quickly order your favorite software to backup, edit and share your favorite Christmas movies, music, and videos. Time-Limited! Action! If you have any problem to buy or use Pavtube, pls feel free to contact [URL]dvdwinsupport@pavtube.com[/URL] (for Windows BD/DVD rippers user), [URL]videowinsupport@pavtube.com[/URL] (for Windows video converters user), [URL]dvdmacsupport@pavtube.com[/URL] (for Mac BD/DVD ripper user), or [URL]videomacsupport@pavtube.com[/URL] (for Mac video converter user). Learn more at https://www.facebook.com/pavtubefans/app/201742856511228/
If you are a super movie fan and also like to produce video, don’t miss the carnival in Mac Blu-ray/DVD/Video Tools on Christmas from Pavtube. Pavtube officially holds the Christmas promotion for All Facebook Fans to get 50% off on his all top-selling Blu-ray/DVD/Video Tools. The softwares involved in the activity contains Pavtube ByteCopy for Mac, BDMagic for Mac, DVDAid for Mac, iMedia Converter for Mac, HD Video Converter for Mac, iMixMXF for Mac.  Copy/Backup Blu-ray/DVD on Mac El Capitan, Yosemite, etc All of Pavtube Blu-ray/DVD/Video tools have updated to support the newest Mac OS X El Capitan systems, so you will get no difficulty to make a full disc copy or the main movie copy of the original 2D/3D Blu-ray/DVD disc on Mac OS X El Capitan. Besides that, the program also enables you to rip/convert Blu-ray/DVD disc to various different file formats on Mac OS X El Capitan, Yosemite, Mavericks, Mountain Lion, etc platform for playing on iPhone/iPad/iPod, Android phone and tablets, Windows phones or tablets, game consoles, HD media players, streaming to Apple TV/Amazon Fire TV/Roku, etc. Play and edit videos on Mac OS X For video editing amateur, you can effectively convert virtually any file formats including AVI, WMV, MP4, MOV, FLV, VOB, MKV, MKV, MTS, M2TS, Tivo, H.265 in SD, HD, 2K, 4K videos to your desired file formats to import your source video to any popular video editing tool. For camera and camcorder users, you will have a fast and fluid workflow on Mac OS X with our program by exporting professional video editing codec such as Apple Prores Codec for Final Cut Pro 6/7/x, Apple Intermediate Codec(AIC) for iMovie/Final Cut Express, DNxHD MOV for Avid Media Composer, After Effects CC/Adobe Premiere Pro/Adobe Premiere Elements/Sony Vegas specially optimized file formats, etc. Learn more at https://www.facebook.com/pavtubefans/app/201742856511228/
Is it possible to access my own DSLR files on NAS to PS3? Now follow this article to play high-bitrate DSLR videos on PlayStation 3 smoothly effortlessly! Question: I mainly store photos and videos from my DSLR on my NAS. I want to review high-bitrate footage on an HDTV (PlayStation 3) and stream it to my iPad when I'm not home. But it is really a huge conflict between DSLR videos on NAS and PS3 Media Player. What should I do? 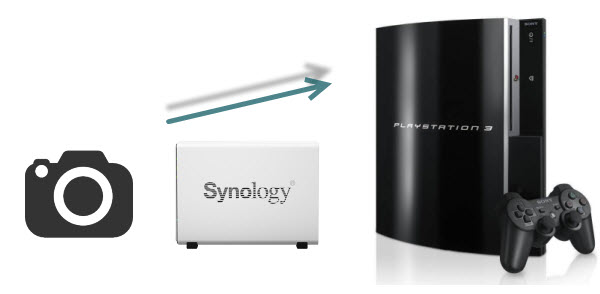 PS3 tends to serve as the all-in-on hub for your home entertainment. However, PS3 supported video formats are quite limited as below: VIDEO: MPEG-1, MPEG-2 (PS,TS), H.264/MEPG-4 AVC, MPEG-4 SP MUSIC: ATRAC (.oma .msa .aa3), AAC (.3gp .mp4), MP3 (.mp3), WAV (.wav) IMAGES: JPEG, GIF, PNG, TIFF Hot Search: PS4 Column | Apple TV 3 Column | Roku Column | Xbox 360 Column | Xbox One Column To watch DSLR video files on PS3, the movie file needs to be converted to H.264 video, with the file extension like .mp4 or .avi. Therefore, if you want to stream videos from my DSLR on NAS to PS3 for playback, an PS3 Video Converter is needed. And according to the PS3 users' feedback, Pavtube Video Converter Ultimate/iMedia Converter for Mac is supposed to be the right choice. It's offers a hassle-free solution to seamlessly make any file fully compatible with the PS3. With it, you can fast change MXF, MTS, MOV, MP4 DSLR movie files on NAS to PS3 compatible formats while keeping the orginal video quality. (Take a look at the review to learn more) Just download the program and follow the tips below to easily make PS3 play your DSLR videos. How to convert videos from my DSLR on NAS to PS3 supported file format Other Download: - Pavtube old official address: http://www.pavtube.cn/blu-ray-video-converter-ultimate/ - Cnet Download: http://download.cnet.com/Pavtube-Video-Converter-Ultimate/3000-2194_4-75938564.html 1. Load DSLR vides to the converter Download and install Video Converter for PS3 on your computer. Run it and directly drag and drop the recordings that you want into the main window of this converter. You can also add your video clips by clicking the “Add Video” button on the left bottom. This Ultimate Converter can also rip your Blu-ray, DVD and YouTube video to play on PS3.
  2. Select format for PS3 After the files are added, click Format > PSP/PS3 and set output video format as PS3 Video(720P) MPEG-4(*.mp4)which the compatible MP4 preset for streaming via PS3 with best video quality.
  Note: PS3 just plays the MP4 files with H.264 video codec and AAC audio. Click the Settings icon to set the correct video, audio codecs.
 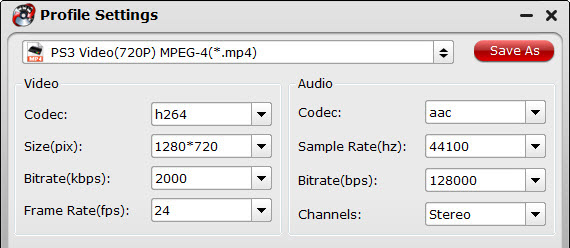 3. Begin the conversion Hit the Convert button to start converting DSLR video from NAS to PS3 for playback. 4. Import Video To PS3 And Enjoy On Bigger Screen After conversion, you could find converted video in the output folder. Copy them to your memory card, external drive or even an iPod, and then plug the storage media into your PlayStation 3 through USB.
 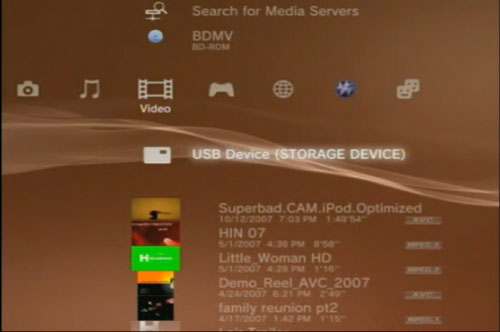 You see, there is flashing indicating USB device (storage device) inserted. Click it and select the video that you want to import. Pressing the triangle button gives you several options -- navigate to "copy"or "move"(find the difference here). Once your transferring is done, your imported video will end up in your PS3 video playlist. And now, you could enjoy your videos from my DSLR on NAS on PS3 system. It is easy right? And are you ready to try it by yourself? More Play MKV, AVI, MP4, FLV, WMV, MPG, MOV by Chromecast Rip DTS-HD track to FLAC 5.1 audio using Plex Upload Blu-ray to Dropbox for Sharing Backup DVD onto Synology DS216play Via Mac El Capitan How to watch 3D Videos on Galaxy Note 4 with Gear VR Blu-ray to iTunes Converter -Sync Blu-rays to iTunes for Apple Devices Watch iTunes Movie on Android Tablet or Smartphone Play Blu-ray ISO with HEVC MP4 on Mac OS X El Capitan Src Stream Videos from NAS to PS3 via DSLR for playback
Decode & Convert HEVC to PS4 for Samsung TV via Mac Yosemite H.265 will surely become the mainstream video codec and format for Apple, or even other mobile device, and Windows. For H. 265 has competitive advantage compared with other video formats like H.264. HEVC/H.265 enables to double the data compression ratio compared to H.264/MPEG-4 AVC at the same level of video quality. It is a wonderful idea to watch video on Samsung TV via Sony PS4. When you got some HEVC videos, you may concern how to sync H.265/HEVC to your PS4 for playback on Samsung TV via Mac. Well, follow this guide and you will get clues. Since HEVC footage can't be recognized by PS4 and Samsung TV, a suggestion is to transcode HEVC files to PS4/Samsung TV friendly MP4 format first. There are few Apps online even free ones for you to choose to decode and encode H.265/HEVC files since H.265 codec is not widely used. Luckily, after read some other users’ feedback online, Pavtube iMedia Converter for Mac is the highly recommended as the best Mac HEVC Video Converter for Samsung NX1 footage or other H.265 video source. The program is an ideal Video Converter for fully supporting decoding and encoding H.265/HEVC codec. Here is the review. Guide: Converting H.265/HEVC files to PS4 for Samsung TV on Mac Yosemite Step 1. Add video files Run the best HEVC Mac Converter for PS4, add single H.265 video or multiple H.265 video files from the same folder to this app by clicking the “Add video" icon. It supports batch conversion, you can import and transcode multiple movies files at one time.  Step 2. Choose output format Go to "Format" page to select output format. We recommend you to choose the common MP4 as the suitable format for both Samsung TV or PS4. Since this progrem added "Common Video >> H.264 Baseline/Main/High Profile Video (*.mp4) presets, we can choose the last one "H.264 High Profile Video (*.mp4)" or "H.264 HD Video (*.mp4)" for video playback and sharing. Learn>> Best formats for Mac.
 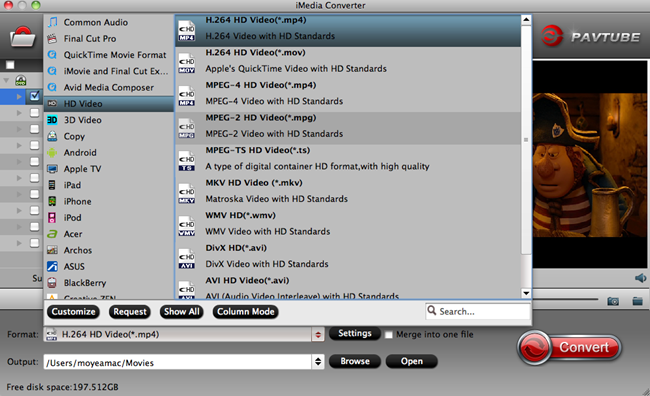 Tip: In addition, simply go to "Settings” panel , you are allowed to adjust profile parameters including video codec, display resolution, bitrate, frame rate, audio sample rate, audio channels, etc. to achieve a better video and audio enjoyment.
 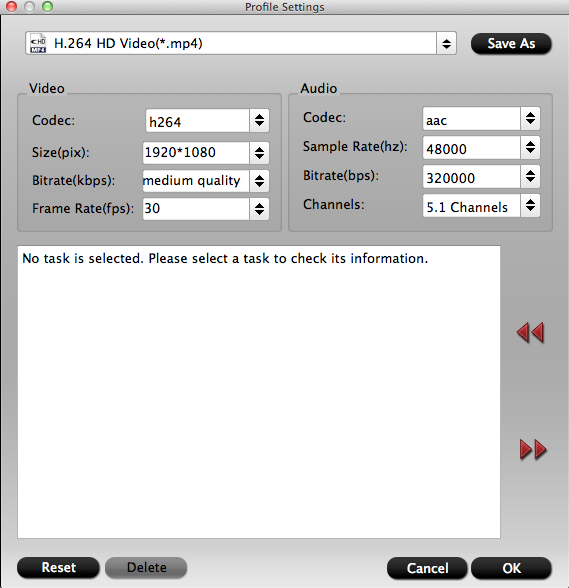 Step 3. Start conversion Click "Convert" button to start encoding HEVC to MP4 for PS4. When the conversion task is finished, click "Open" button to get the exported files. Now, you can transfer and play HEVC files on Mac at ease. Conclusion: From the two measures we mentioned above, I don’t know which one you will like as the best. But frankly speaking, if you are not familiar with the new codec H.265/HEVC, I suggest to choose the easiest one, Pavtube HEVC Mac Encoder can do you a big favor. Such an easy operation that we can all do well. More Play TiVo recordings on Kindle Fire HDX, Kindle Fire HD and Kindle Fire Strore DVD ISO onto QNAP with VLC server and stream to Sony Bravia TV Convert AVI from MiniDV cassettes to Apple TV with AC3 5.1 Apple iPhone 6 and iPhone 6 Plus on Pavtube Special Topic Dropbox brings Mailbox to Android, launches Carousel How to get the World Cup Schedule in Google Calendar Rip a DVD ISO to MKV for streaming via Plex with multi audio tracks Does Samsung Galaxy TabPro 10.1 supports 720p/1080p MKV Video Playback Src Decode & Convert HEVC to PS4 for Samsung TV via Mac
Everyone’s happy in Stinky Cigars, the secret town where all the holiday characters live – except Murray Weiner, the grumpy owner of Murray’s Holiday Diner. But when Santa is knocked out cold by an experimental toy – the Jack-in-the-Boxer – it’s up to Murray to save Christmas – which he does, in a weirdly wonderful way. This is the story told in the movie-How Murray Saved Christmas. 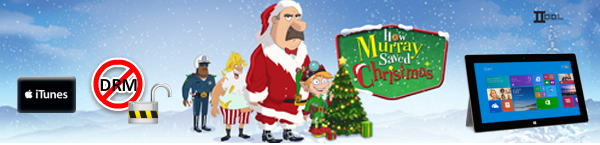 If you buy How Murray Saved Christmas on iTunes and want to transfer it to Surface Pro to watch, then you got it. However, iTunes video is DRM protected which will be disfavored as it prevents them from fully accessing to those videos on non-apple devices, not to mention the rental ones. Therefore, to remove iTunes DRM for watching limitlessly on Surface Pro seems to be of top priority. With Best DRM removal tool – Pavtube ChewTune you could easily remove DRM from iTunes video and convert iTunes M4V videos to Surface Pro support video with fast speed and high quality. Therefore, you can freely enjoy iTunes videos on Surface Pro without any limitations or DRM protection. Read the review. With it, you can also sync Amazon wmv video and Digital Copy to Surface tablets. Step 1. Load your iTunes M4V video to Pavtube iTunes to Surface Pro converter. You can either browser to file location or drag and drop source How Murray Saved Christmas iTunes file to the app.
 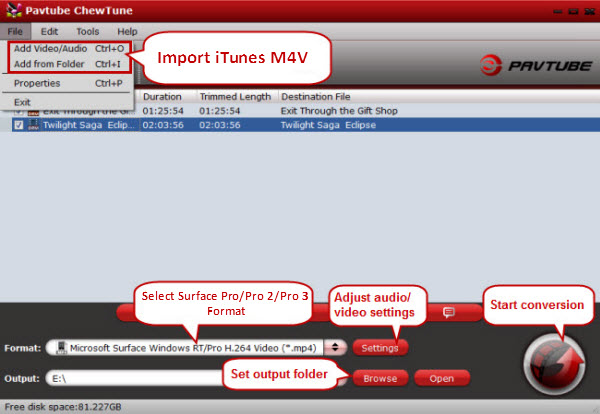 Step 2. Choose the optimized profile for Surface Pro. Click the “Format” drop-down menu and select “Microsoft > Microsoft Surface Windows RT/Pro H.264 Video (*.mp4)”.
 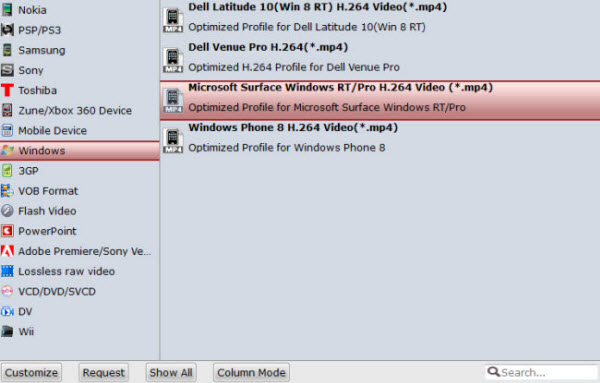 Step 3. Is necessary, you could set video and audio parameters such as video and audio codec, bitrate, frame rate, etc so that better video and audio quality can be transferred to your Surface Pro tablet. Step 4. Hit the “Convert” button to start How Murray Saved Christmas iTunes M4V to Surface Pro MP4 recording. Since Pavtube ChewTune records source DRM videos in 1:1 video and audio quality, it would take as long as the source movie length for the whole DRM video to Surface Pro conversion process since Pavtube ChewTune records source DRM videos in 1:1 video and audio quality. Once it completes, open output folder, locate the created MP4 file and transfer the iTunes M4V movies to Surface Pro tablet for viewing. More Import Galaxy S6/S6 Edge videos to iMovie for Mac OS X El Capitan Is there a way to cast a Blu-ray using Chromecast 2 from PC to TV? Does Samsung Galaxy Tab S 10.5 and 8.4 play MVI videos? Transfer and Rip TiVo Recordings to Apple TV 4 without Quality Loss Store MKV M2TS to Sony PS4 – Play HD Movies on a Display through PS4 Place Blu-Ray To Micro SD Card For Android Tablets Watch Rental Netflix 3D Blu-ray to PS4 via Mac Yosemite Src Play How Murray Saved Christmas iTunes movie on Surface
The future is finally here – consumer virtual reality headsets are coming this Christmas that work in conjunction with the smartphone in your pocket, rather than being tied to a computer or consoles as with the Oculus Rift and PlayStation VR. 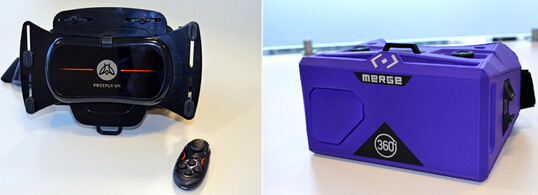 Super-keen virtual reality nerds will already have queued up for hours to test out the upcoming Samsung Gear VR or the HTC Vive, but if you’re just a casual user who wouldn’t mind dipping your toe in the water and you don’t want to pay a premium price, then there is an alternative.Merge VR Googles and the Freefly VR headset are two virtual reality headsets now on the market that aim to give a better experience than Google Cardboard, while still not breaking the bank. But are they any good? Let’s find out.
 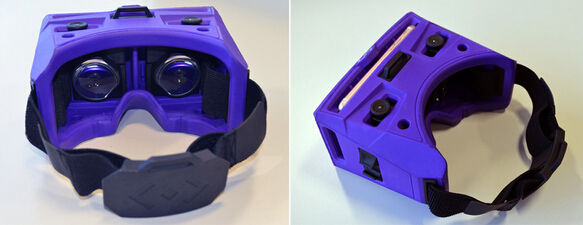 The Merge VR Goggles come with an adjustable head strap, knobs to adjust the lenses and the buttons on the iPhone 6S are easily accessible for interactionIBTimes UK The Merge VR Goggles feature adjustable straps and lenses, which is useful to ensure that your view of the VR app is as clear as possible. There is also a hole in the front of the headset where presumably one day the smartphone’s camera can interact with a virtual reality landscape, but there are no apps that allow you to test this feature for now. The headset was very comfortable to wear and it was good to be able to instantly adjust the volume on the smartphone through the hole on the top of the headset. However, even after adjusting the lenses, the view still seemed to be a bit blurry, almost as if the app was in quite low resolution. After wearing the headset for a while it becomes quite heavy and your eyes start to feel strained. The general advice with VR headsets is that you can’t wear them for too long, but this is a pity as you can’t get sucked into a VR app game the way you do with a video game console. One plus point about this headset is that it’s made from hypoallergenic foam, but the negative is that it feels very block-y and a bit cheap. Merge VR Googles The Verdict The Merge VR is very comfortable to wear and it is definitely lighter on your head than the Oculus Rift or the Samsung Gear VR, but at the end of the day, it’s still only made from foam, so it doesn’t have the sophisticated feel you’d expect from spending £50. Scores:
- Design: 8/10 - The foam is comfortable and the lenses and straps are easily adjustable.
- Lenses: 6/10 - The lenses were not as clear as they could be.
- Functionality: 6/10 - Smartphone buttons easy to access, but interaction is limited besides moving your head.
Pros:
- Adjustable straps.
- Light, comfortable, hypoallergenic design.
- Easy to access smartphone buttons.
Cons:
- Feels cheap.
- Interactions are limited.
- No electronic input.
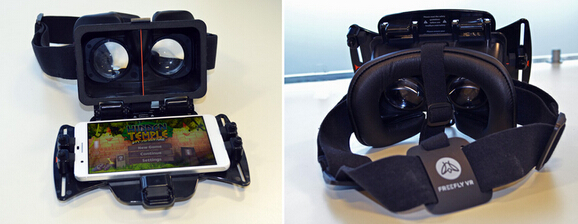 The Freefly VR headset opens up so the Huawei Honor 6 Plus smartphone can be securely clipped insideIBTimes UK The Freefly VR headset is quite comfortable to wear and is lighter than the Merge VR, so you can wear it for a long period of time without feeling burdened by the weight of the headset on your head. It also has very good lenses, although sometimes it feels that from certain angles you need the headset to be even closer to your face, and you cannot adjust the straps to achieve this. The plastic feels rather cheap, and the design prevents the user from adjusting the volume or touching any of the smartphone buttons once the phone has been clipped into the headset. You could use headphones, but if you don’t want to, this can be quite annoying as you have to start the app on the smartphone, adjust the volume to what you think it should be, secure the phone to the backing board and then close the headset. There’s no start button on the headset, so it feels that you’re playing catch-up once you put the headset on. The Glide joystick features similar controls to a game console controller. It connects with ease to the smartphone, but as there are almost no VR apps that are Glide-enabled and the ones that are don’t work that great, there is not much to say for now. Freefly VR Headset The Verdict The Freefly VR headset is comfortable to wear and has good lenses, but the plastic makes it feel like a low-end product. However, the Bluetooth-enabled joystick worked perfectly with game apps and enabled a good range of interaction. Scores:
- Design: 7/10 - Lenses and straps are not adjustable; at times you need to hold it to your head.
- Lenses: 8/10 - The lenses are quite clear.
- Functionality: 6/10 - Smartphone buttons inaccessible, but joystick offers additional functionality.
Pros:
- Good lenses.
- Joystick offers interactivity.
- Light and comfortable to wear.
Cons:
- Feels cheap.
- No access to smartphone volume buttons.
- No electronic input.
- Straps can’t be adjusted.
Which should you buy? It depends what you need the VR headset for. If you’re running a promotional marketing event and you want some headsets for the public to view a VR experience, like a 360-degree music video, then both headsets are a massive step-up from Google Cardboard, and I would recommend the Merge VR, especially since it is made from durable hypoallergenic foam, making it a good choice for children too. But if you want to play games, then you might be better off with the Freefly VR headset, which has the Glide joystick that you can interact with, although at the moment, none of the VR apps really work with the Glide. Sadly, both headsets lack the premium feel of being a cool gadget you’re excited to own. If you’re an adult gamer, you’d probably enjoy using the Samsung Gear VR or the Oculus Rift more, as they feel more like the luxury experience you expect from a tech gadget today. In terms of the technology itself, you can’t wear the headsets for very long or you will start to get a headache (or even motion sickness). The standard advice is that you should take the headset off every 10 minutes, but this won’t lead to consumers investing much into the app experience. At the moment, there aren’t many apps for people to play with, and the apps that do exist tend to be mostly VR experiences with little to no interaction with the consumer. There are some VR games, but these mostly rely on the user having to endlessly turn their neck and move their head in order for the phone to pick up the head gesture and translate it into a command in the app. To be fair, these problems are universal across all virtual reality headsets, including the higher-end Samsung Gear VR and the Oculus Rift – my sources who demo these headsets to the public say consumers, including gamers, who try on these headsets complain of headaches, eye strain and irritation after having the headsets on for only a short period of time. Much still needs to change to make virtual reality a viable hobby. Even if you have all the exciting content in the world, people won’t be using virtual reality headsets for lengths of time if the headsets place stress on the eyes and head, and will probably stick to video game consoles and TV. More Import Galaxy S6/S6 Edge videos to iMovie for Mac OS X El Capitan Is there a way to cast a Blu-ray using Chromecast 2 from PC to TV? Does Samsung Galaxy Tab S 10.5 and 8.4 play MVI videos? Transfer and Rip TiVo Recordings to Apple TV 4 without Quality Loss Store MKV M2TS to Sony PS4 – Play HD Movies on a Display through PS4 Place Blu-Ray To Micro SD Card For Android Tablets Watch Rental Netflix 3D Blu-ray to PS4 via Mac Yosemite SrcHow to Convert ISO to Synology NAS for Streaming on iPad