While the 4K push moves forward across the board with numerous consumer electronics like cameras, TVs, PCs and even mobile devices, it seems like everyone is jumping on the bandwagon. This also include the new gaming platforms Play Station 4 and Xbox One from Microsoft. With the HDMI 2.0 cable connected, you can play 4K Movies and Videos with PS4 and enjoy it on 4K TV or big screen TV. After shooting crystal clear Ultra HD footage, why not enjoy movies in 4K resolution with PS4 game console?
 However, although PS4 supports 4K movie streaming, there’s video format/codec incompatibility problem. Currently, 4K content could presumably use either H.264 or H.265 for encoding, while PS4 probablywon’t support H.265. Moreover, even if it supports H.264, the video format problem remains: today, most of 4K movies are recorded in MXF/RAW/XAVC/XAVC-S format which the PS4 does not support. Even if PS4 supports 4K MP4 , there’re not many 4K MP4 video source available for you. Consequently, for native importation of 4K Movies and Videos to PS4, it is highly advisable to first convert 4K Movies and Videos with appropriate codec and format for playback. Then, of course, we know what you really want to see PS4 supported video and audio file formats and codec details. Video MKV
- Visual: H.264/MPEG-4 AVC High Profile Level4.2
- Audio: MP3, AAC LC, AC-3(Dolby Digital)
AVI
- Visual: MPEG4 ASP, H.264/MPEG-4 AVC High Profile Level4.2
- Audio: MP3, AAC LC, AC-3(Dolby Digital)
MP4
- Visual: H.264/MPEG-4 AVC High Profile Level4.2
- Audio: AAC LC, AC-3(Dolby Digital)
MPEG-2 TS
- Visual: H.264/MPEG-4 AVC High Profile Level4.2, MPEG2 Visual
- Audio: MP2(MPEG2 Audio Layer 2), AAC LC, AC-3(Dolby Digital)
AVCHD: (.m2ts, .mts) Music MP3 AAC (M4A) Photo JPEG (based on DCF 2.0/Exif 2.21) BMP PNG Searched high and low solutions for 4K Movie conversion for PS4, some guys gave me some clues: 1. FFmpeg should be able to remux from 4K video to .mp4 with no transcoding necessary. I’ve tried yet, it imports my 4K XAVC-S videos, but it takes more time than its worth. I’d gvie up the way. 2. Pavtube Video Converter Ultimate, a top 4K to PS4 Converter app It’s a professional yet decent 4K Movie Converter for PS4, or an alternative to FFmpegwhich can perfectly transcode or rewrap 4K MXF/RAW/XAVC/XAVC-S/MP4 movies with H.264 codec or 4K H.265 to PS4 accepted MP4 format with several simple steps and 100% the original 4K video quality kept. What’s more, with the built-in video editor, it’s freely for you to trim the 4K videos into multiple segments with short duration. The most important is that, it allows you to modify the video bitrate, frame rate, video size, audio channel, etc for your original 4K clips for easier streaming. With its help, playing 4K movie with PS4 or other portable devices like Windows 10 tablets/phones will be so much easier. Just download it and follow below steps to convert 4K Movies and Videos to PS4 for enjoying now. 
 Guide: Transcode/Rewrap 4K Movies and Videos to PS4 Step 1: Import 4K files Install and launch the 4K file converter. Then you can add the 4K videos to the program by clicking Add button or directly drag and drop.
 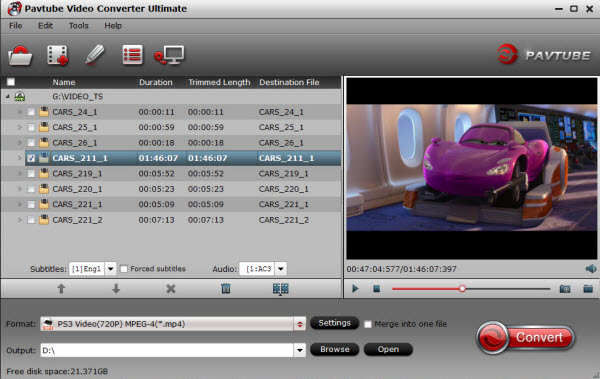 Step 2: Choose MP4 as output format To play 4K Movies and Videos with PS4, click format bar and choose “”PS3 Video (720P) MPEG-4 (*.mp4)” ” or “PS3 Video (1080P) MPEG-4 (*.mp4)” from “PSP/PS3″. Besides encode 4K to PS4 supported MP4, this 4K Movie Converter also support converting 4K files to various video formats like AVI, MOV, WMV, MKV and converting 4K to various devices like iPad, iPhone, Surface 3, Surface Hub, Samsung Galaxy Tab, Apple TV 3, etc.
 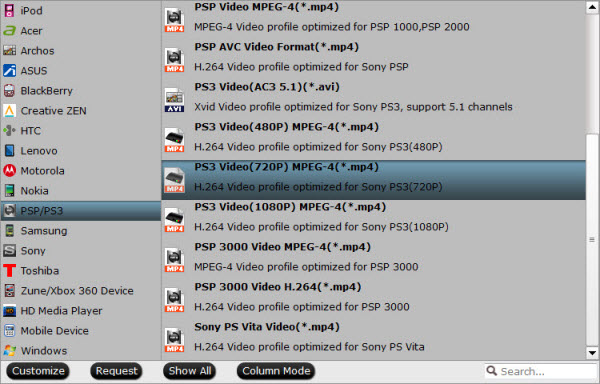 Step 3: Adjust the video, audio settings The default and optimal output video resolution for PS4 will be 1920*1080. If you don’t want to spend long time for loading 4K Movies and Videos to PS4, you can downsize your 4K to 1080p , or change the video resolution to 4096*2160 so as to keep the original 4K quality by pressing the “Settings” button and go into “Profile Settings”. Step 4: Do premiere editing Click Edit button and you can trim, crop or adjust the video with the built-in video editor to get the very part and effect of the movie you want. Step 5: Start 4K to PS4 conversion Click “Convert” to start converting 4K Movies and Videos to MP4 for PS4. After conversion, click “Open” button to locate the converted video files. Tips: How to Transfer video to PS4 Video from PC/Mac Media Streaming without DLNA | Via USB | Via Network PlayStation 4 is thereby used as a host and a controller, through which you can play the HD movies on the display of computer monitor, video projector, digital television, or digital audio device with the help of HDMI or optical S/PDIF. We believe the Media Player will be a favorite new feature for PS4 owners who love to use their PS4 as the entertainment center of their living room. You can play 4K Movies and Videos on PlayStatin 4 (PS4) now. More How to Watch Blu-ray Movies on QuickTime on Mac OS X El Can’t Transfer Blu-rays on your New iPod Touch Put and Play Digital Copy movies on Galaxy Tab 3 Work Panasonic HD MTS Files with iPad or Apple TV Well Easiest way to convert Video_ts folder for use on Plex server Best DVD Copying software for ripping DVD to store on NAS Play DVD on iPad, Backup DVD to Wireless Plus for streaming to iPad Stream/Transfer ISO files to Chromecast within 3 clicks Src PS4 4K Streaming – Play 4K Movie and Videos with Sony PS4
Blu-ray, a digital optical disc data storage format, was designed to supersede the DVD format. Blu Ray is capable of storing high-definition video resolution, first at 1080p resolution (1920×1080 pixels). And 4k Blu-Ray disc is to become available towards the end of 2015. 4K Blu Ray will be coded with latest H.265/HEVC codec, and will be at at higher frame-rates 4k 4096×2160 at 60 Hz, with expanded color by using quantum dots, in High Dynamic Range, HDR and expanded color with 10-bit. Hot Search: Blu-ray Tips | | Methods about BD Backup | Directly Copy Blu-ray with keeping 7.1 | 3D Blu-ray to Stereoscopic Player Apple is ready to add some new Mac hardware into its fall product line. Apple is currently announced a new 21.5-inch iMacs with 4K screens next week, according to multiple reliable sources. While the new computers has showed up in stores at Tuesday, October 13th, Apple will ramp up larger quantities for November, according to the sources, so finding one early on may be a slight challenge. So, have you decided to watching Blu-ray on this 4k devices? Audio and Video Formats Supported By/Compatible with iMac with E1 Capitan Audio files supported by iMac: M4A, m4b, .m4p (all are iTunes audio), MP3, Core Audio (.caf), AIFF, AU, SD2, WAV, SND, AMR Video files supported by iMac: QuickTime Movie (.mov), MPEG-4 (.mp4, .m4v), MPEG-2 (OSX 10.0-10.6 are exclusive), MPEG-1, 3GPP, 3GPP2, AVCHD (OSX 10.0-10.7 are exclusive), AVI ((Motion JPEG only), DV; Formats supported by or compatible with Mac cannot be considered as the best formats for Mac. The best video formats for Mac are MP4, M4V and MOV. Therefore, when playing video files or syncing video files on a Mac Pro, MacBook, iMac or MacMini, you’d better make sure that the videos are in MP4, M4V or MOV format. Here I would recommend you a professional Blu-ray to 4K video tool to you--Pavtube BDMagic for Mac. It can rip Blu-ray to H.265/HEVC encoding 4K video files losslessly on your iMac, and can rip most popular 2D &3D Blu-ray disc, Blu-ray folder and Blu-ray ISO image files with wonderful image and sound quality. If you are Windows user, please turn to Pavtube BDMagic. Below is the step by step guides! 
 Other Download: - Pavtube old official address: http://www.pavtube.cn/blu-ray-ripper-mac/ - Cnet Download: http://download.cnet.com/Pavtube-BDMagic/3000-7970_4-76177782.html
 Other Download: - Pavtube old official address: http://www.pavtube.cn/blu-ray-ripper/ - Cnet Download: http://download.cnet.com/Pavtube-BDMagic/3000-7970_4-75922877.html Rip Blu-ray to 4K iMac with El Capitan without Quality loss Step 1. Load Blu-ray Files Click "Add Video" or "Add from folder" button on the top menu to browse and choose the file you want to convert to the program.
 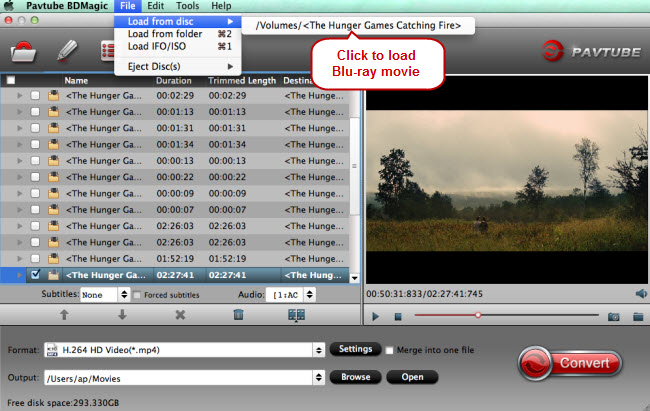 Step 2. Choose the H.265 Format In "Format" pane, from the drop-down format available from the software, to make the output format better playback on your iMac, you can select "Common Video > H.265 video(*.mp4) " as the output format.
 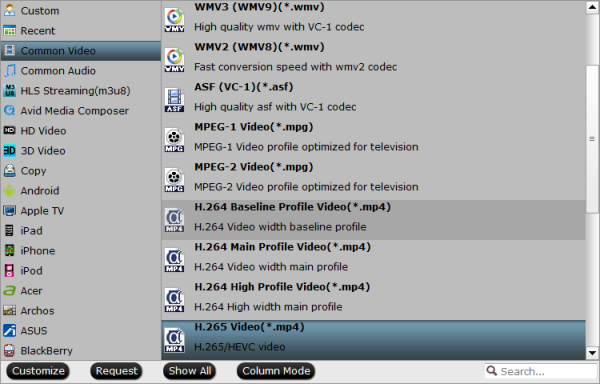 Step 3. Begin the Conversion Hit "Convert" button in the bottom part of the program to start Blu-ray to H.265/HEVC video conversion process. And You can easily find the output files in the output folders once the conversion is done.
It is clear that Sony PlayStation 4 is one of the best video game consoles in the world as well as the Microsoft Xbox One. But the PlayStation 4 is not only a top video game console, it is also a powerful home media center for share photos, music and videos to HD TV for playing and sharing.  However, the PS4 has a very limited support for local media files. It is compatible with apps such as Netflix or Amazon Instant Video, but does not have much support for local files. The PS4 Media Player App supports some local usb storage and media servers, but is not necessarily the best experience.
There are ways to stream video content from your PC to your PS4, and provided you have a reasonable PC and a decent local network, you’ll have no problem streaming locally 1080p movies to your PS4 as well. What this means is you can access your entire library of movies from your couch, your very own PS4 Media Server. People are regularly asking about the possibility to stream local content to the PS4 through a PS4 compatible media server. Doing so is actually extremely simple and is free, thanks to the Plex Media Server and the power of HTML5. The trick is that we will be streaming videos in the PS4 browser, in full screen, through HTML5. People usually have concerns about streaming through HTML5, but the technology is now on par with what’s possible with a native app, and in my tests the streaming was basically as good as (if not better than) watching an HD video on Netflix. As an added bonus, Plex does not give you only access to your local files, it also has access to other video channels. Alright, let’s set up our PS4 Media Server The setup is reasonably easy. It basically consists in installing the free plex ps4 media server on your PC, Adding your video folders to it, then accessing its web interface through the PS4’s web browser.
However, the PS4 has a very limited support for local media files. It is compatible with apps such as Netflix or Amazon Instant Video, but does not have much support for local files. The PS4 Media Player App supports some local usb storage and media servers, but is not necessarily the best experience.
There are ways to stream video content from your PC to your PS4, and provided you have a reasonable PC and a decent local network, you’ll have no problem streaming locally 1080p movies to your PS4 as well. What this means is you can access your entire library of movies from your couch, your very own PS4 Media Server. People are regularly asking about the possibility to stream local content to the PS4 through a PS4 compatible media server. Doing so is actually extremely simple and is free, thanks to the Plex Media Server and the power of HTML5. The trick is that we will be streaming videos in the PS4 browser, in full screen, through HTML5. People usually have concerns about streaming through HTML5, but the technology is now on par with what’s possible with a native app, and in my tests the streaming was basically as good as (if not better than) watching an HD video on Netflix. As an added bonus, Plex does not give you only access to your local files, it also has access to other video channels. Alright, let’s set up our PS4 Media Server The setup is reasonably easy. It basically consists in installing the free plex ps4 media server on your PC, Adding your video folders to it, then accessing its web interface through the PS4’s web browser. 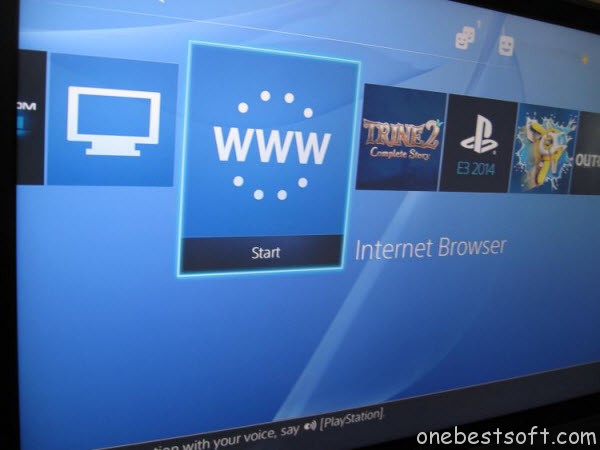 1. (On your PC) Download and install Plex Media Server Plex Media Server is free and can be downloaded here. Install and run it. On windows, you should see a new icon in your task bar, telling you that Plex media server is running. 2. (On your PC) Add videos to your Plex library
 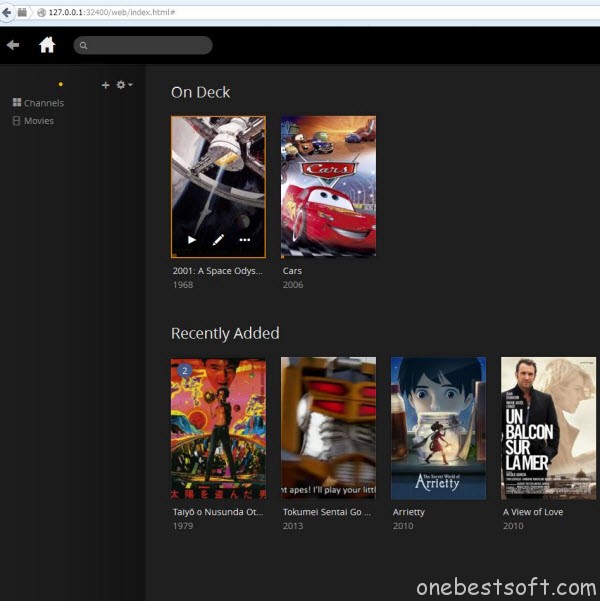 Troubleshooting: if the Plex interface does not show up when you type 127.0.0.1:32400/web in your browser, make sure the Plex Media server is running on your PC. On Windows, You should be seeing the PLEX Media server icon in your toolbar. More details on the PLEX Help pages. To add your local movies to the Plex library, click on the “+” symbol in the left side Menu of the page, (above “Channels”). This will open the UI to add a new folder. You can then select a folder on your hard drive and Plex will process it.
 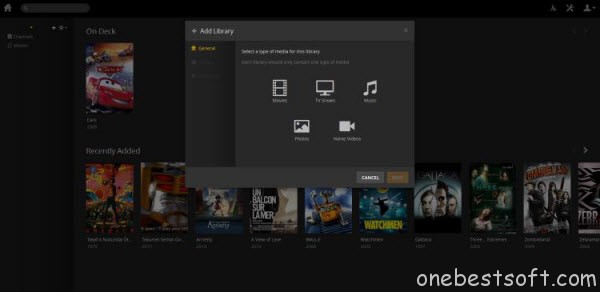 In order to get the best of Plex, you should follow the XBMC naming conventions for your movies. It’s a pain to do the first time you do it, but I can guarantee this will make your life easier as most Movie managers use these conventions. Once this is done and to make sure things are working correctly, go ahead and try to play one of your movies locally in your PC browser from the Plex interface. 3. (On your PS4) Access Plex on your PS4 and configure it Fire up your PS4 and run your browser. For this step you’ll need to know your computer’s local IP address. Typically this will be something like 192.168.1.2. On windows you can get this information by opening a command line and typing “ipconfig”. Run the PS4 browser and type your IP address followed by “:32400/web”. For example: 192.168.1.2:32400/web. The Plex interface should appear on your PS4 screen.
 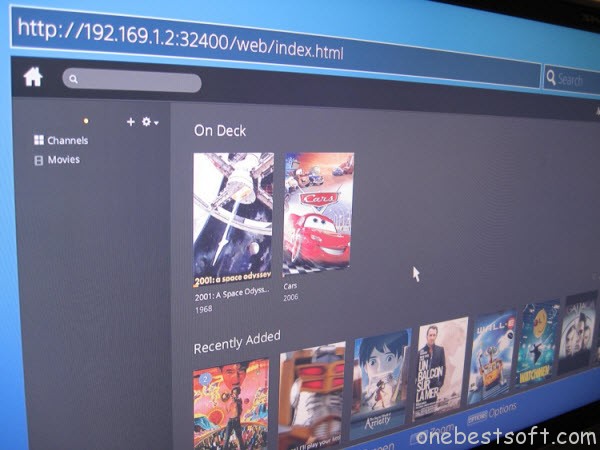 Tip: It is easier to test that everything works correctly with a computer first. For example borrow one of your family members’ computer and make sure you can access your Plex Media server from the local network. Once you get it working with computers on your network, you shouldn’t have any issues doing it with your PS4. Important configuration step: since the PS4 1.70 update, some video format compatibility got broken on the PS4. In order to get videos to work, you need to change a few parameters. In particular, you need to force AAC Audio. This is done by going to Settings > Web > Player > Show Advanced > Prefer AAC Audio. It’s important to note that you need to enable this setting from the PS4. Setting it from any other client machine will just apply the setting for that specific client, not for your PS4.
 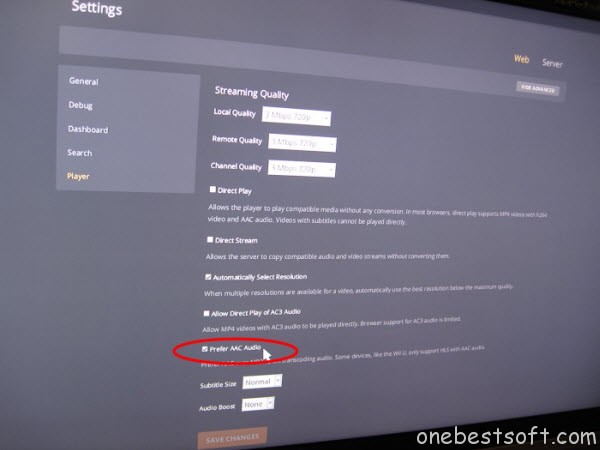 A typical symptom if you don’t do the configuration change above in Plex is that on your PS4, playing the video will constantly be showing the “buffering” animation and never start the movie. Note: the tip above might not work with all movie files. If you run into non_working files, the only known solution for now is to re-encode your movies locally in MP4 and enabling the “optimize for web viewing” setting, for example using Handbrake. Or get Pavtube Video Converter Ultimate in hand to do conversion. I personally have yet to find a single movie that doesn’t work for me with the “AAC” setting though. 4. Enjoy! Assuming you can access your local Plex url from your PS4’s browser as explained, and that you did the configuration change above, you should be able to start streaming movies from your computer to your PS4. Press square on your PS4 remote for fullscreen, and enjoy your movies! With my mid-range laptop computer, I am able to stream 1080p movies to my PS4 without any lag, so I believe this solution will work fine for most people. Tip: A LAN connection on both your PC and your PS4 will give much better results than Wifi for streaming movies!
Pavtube 40% Off Spirit Halloween Coupons & Discount Pavtube launched 40% OFF Halloween Promotion from October 21 to November 6, 2015 when users can get top Video/DVD/BD Converter for Win/Mac with the least money. pavtube halloween promotion,halloween special offer, halloween sale 2015 Halloween is coming. To give you a better Halloween celebration, Pavtube holds 40% off Halloween promotion from October 21 to November 6, 2015. During the period, you can get the professional Blu-ray/DVD Ripper and Video Converter for Win/Mac with less money than any other campaign. During Halloween, many people will not just watch Halloween movies but make Halloween videos by themselves. No matter Halloween movies enjoyment or Halloween video production, you probably need a video converter. For example, when you want to play your Blu-ray/DVD Halloween disc on your iPad Pro, Surface Pro 3, you can rip the disc to the device supported format with Pavtube BDMagic or Pavtube DVAid. Another case, you record the Halloween party scene and you are about to upload the camcorder video to Facebook to show your cool dressup, you’d better choose to transcode the camera video to Facebook or Vimeo accepted video with Pavtube Video Converter Ultimate. No matter what situations about video editing and producing, you can find the software you want at Pavtube Studio. Pavtube product is closed-source, not like Handbrake. But it deserves to pay for its life-long technical support and update in time to compatible with any Win/Mac system upgrade. Catch this opportunity and enjoy the best video production experience with the least money. The price comparison of Pavtube featured products between Halloween price and original price is as below:
- Pavtube Video Converter Ultimate: Original price $65, Now $52
- Pavtube BDMagic: Original price $49, Now $34.3
- Pavtube DVDAid: Original price $35, Now $21
- Pavtube ByteCopy: Original price $42, Now $33.6
Note: This attractive price will only be get until November 6, 2015. Please bear in mind all software programs will go back to original prices once the Halloween special offer 2015 ends. Time-limited. What are you waiting for? Action now!
The PS4 allows users to create, edit, and upload video recordings. The video recording and sharing functionality in Sony’s PlayStation 4 is not quite robust enough to replace traditional video capture hardware. But if you want to share a few minutes of cool footage with your Facebook friends, it’s pretty simple to do so.
 1. Use the Share button. Click on the Share button on your controller whenever you’re ready to edit and share your clip. This will automatically bring up the Video Upload or Screenshot Upload options. Click on Video Upload.
 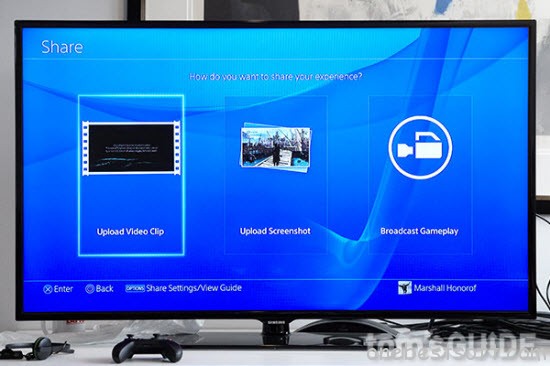 You’ll see a selection of recently recorded PS4 clips. Keep in mind that these will not necessarily be 15 minutes long; every time you click the Share button, the PS4 stops recording and begins again anew. Choose the video that contains the bit of gameplay you want to share.
 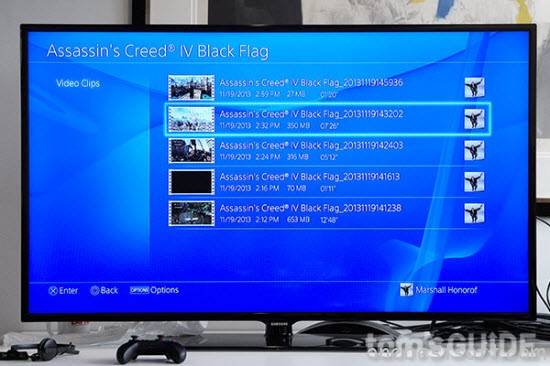 2. Edit your clip. The PS4 will inform you that you can trim your video prior to posting it. Keep in mind that you will not be able to add narration, cut together multiple clips or add titles and transitions like in a traditional piece of video editing software. This is just for sharing short gameplay clips.
  On the next screen, scroll through your clip until you find your starting point. By default, you can scroll through in 10-second increments, but you can also change the interval if you’re looking for broader or narrower swaths of footage.
 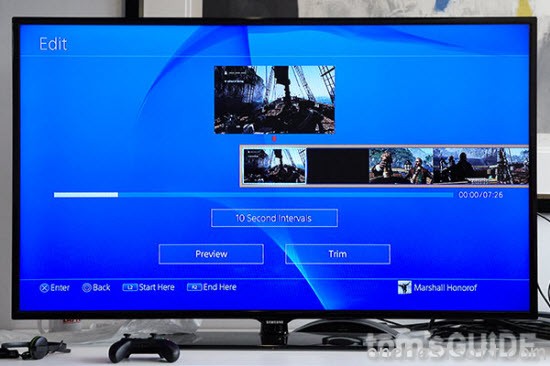 When you find your starting point, hit the L2 button to begin your footage there.
 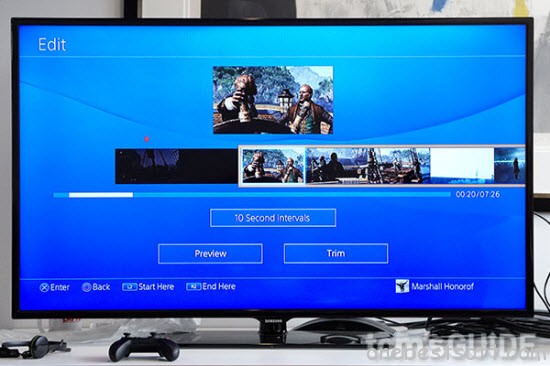 Scroll through the footage until you find your ending point. Hit R2 to bookend the video.
 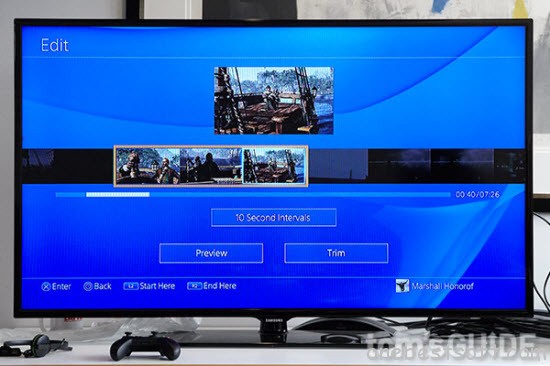 At this point, you can click Preview to watch your selection, or Trim to cut the clip down to size. 3. Share your video on Facebook. From here, all you have to do is give the video a title (by default, it will have the game’s name plus a random string of numbers and letters) and pen a brief description of what it is.
 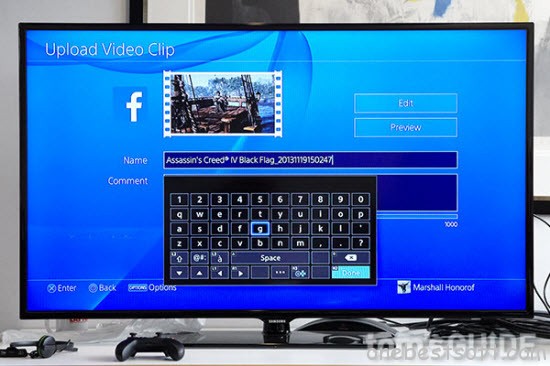 Scroll down to the bottom of the screen and click Share.
 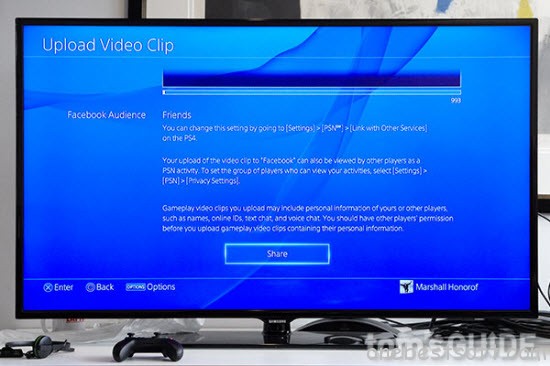 The video will automatically upload to Facebook. You can check its progress in the Uploads section of the Notifications menu.
 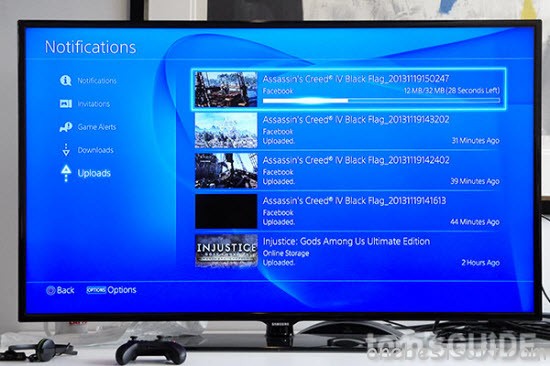 Once the video is done uploading, it will appear automatically on your Facebook page. There is no way to download it, however, unless you use a workaround such as screen capture software. You can check out the video if you want to see how a short, completed clip looks. In the future, the PS4 may allow more comprehensive video editing, but for now, this is what PS4 owners get: a quick and easy way to share video clips, but no real method of presenting them in a polished or curated fashion. Additional Editing Tips: Then would you like to edit your PS4 recorded videos on another platform like PC/Mac if you’re looking for additional editing features? For some amateurs, they may choose professional video editors like Avid MC, Premiere Pro, FCP, iMovie, etc.
And in my part, I recommend simple video converter, which has the function of converting, and the equal function of editing. Compared with others, it is more powerful due to a broader format support.HerePavtube Video Converter Ultimate/iMedia Converter for Mac is such an ideal tool with a user-friendly interface, lots to offer but affordable at the same time. With it, you are able to import any video and audio in all hot formats into the program for editing, like AVI, MP4, MKV, AVCHD, WMV, XAVC, 4K video, H.265 and more. And you can trim, crop, rotate your video files, add video effects/watermarks/subtitles and more with several simple drag-and-drops. 1.Trim, Flip, Rotate your videos Trim: Choose to reserve the part you need. Just choose the chapter which you need to trim, to set “start time” or “end time”, type the portion which you want to save. Flip Horizontal: Click to flip the image horizontally. Flip Vertical: Click to flip the image vertically. Rotate conunter-clockwise: Click to rotate the image 90°towards left. Rotate clockwise: Click to rotate the image 90°towards right. 2. Crop the videos to remove black edges or just get the scale of video you want. Crop: You may change the size in the “Left” and “Top” box. The effect will appear in the video simultaneously. And you may also drag the pane to choose the size you want. 3. Add the text watermark. Text Watermark: Check Enable, you can add text watermark to selected video clip. You can either set parameters or drag the text on preview screen to set its location. 4. Add the images/video watermark. Image/Video Watermark: Check Enable, you can add images or videos as watermark onto selected video file. The location can also be set by dragging on the preview screen. 5. Add Effect Effect: Under Effect tab, you can add special effect and other special effects like Simple Gauss Blur, Flip Color, Invert, Aged Film to your source video. In Color Control section, you can correct color by adjusting brightness, contrast, and saturation. You can also tick off “Deinterlacing” to keep good image quality. 6. Replace the audio of the original videos to put your own audio on it. Audio Editor: You can either replace/remove original audio, or set audio fade in/out effects. 7. Insert *.srt or *.ass/*.ssa subtitle Subtitle:In this tab, you can add *.srt or *.ass/*.ssa subtitle-files to the video as hard subtitles. More Stream Any Video from Your PC, Mac, Android or iOS Device to Chromecast Plex Tivo Shows Workaround – Importing Tivo files to Plex Encode ISO to Gear VR via Chromecast on Mac 10.11 Can’t Transfer Blu-rays on your New iPod Touch? Convert Protected/Non-protected M4V to Galaxy Tab 4 Nook Copy Frozen (Two-Disc Blu-ray / DVD + Digital Copy) to Kindle Fire HDX Keep Watch iTunes movies via Apple TV 4 Forever Play 4K UHD Videos on 4K HD TV for 4K HD Experience Src Trim, Preview and Share Video Recorded On PS4
Once the video is done uploading, it will appear automatically on your Facebook page. There is no way to download it, however, unless you use a workaround such as screen capture software. You can check out the video if you want to see how a short, completed clip looks. In the future, the PS4 may allow more comprehensive video editing, but for now, this is what PS4 owners get: a quick and easy way to share video clips, but no real method of presenting them in a polished or curated fashion. Additional Editing Tips: Then would you like to edit your PS4 recorded videos on another platform like PC/Mac if you’re looking for additional editing features? For some amateurs, they may choose professional video editors like Avid MC, Premiere Pro, FCP, iMovie, etc.
And in my part, I recommend simple video converter, which has the function of converting, and the equal function of editing. Compared with others, it is more powerful due to a broader format support.HerePavtube Video Converter Ultimate/iMedia Converter for Mac is such an ideal tool with a user-friendly interface, lots to offer but affordable at the same time. With it, you are able to import any video and audio in all hot formats into the program for editing, like AVI, MP4, MKV, AVCHD, WMV, XAVC, 4K video, H.265 and more. And you can trim, crop, rotate your video files, add video effects/watermarks/subtitles and more with several simple drag-and-drops. 1.Trim, Flip, Rotate your videos Trim: Choose to reserve the part you need. Just choose the chapter which you need to trim, to set “start time” or “end time”, type the portion which you want to save. Flip Horizontal: Click to flip the image horizontally. Flip Vertical: Click to flip the image vertically. Rotate conunter-clockwise: Click to rotate the image 90°towards left. Rotate clockwise: Click to rotate the image 90°towards right. 2. Crop the videos to remove black edges or just get the scale of video you want. Crop: You may change the size in the “Left” and “Top” box. The effect will appear in the video simultaneously. And you may also drag the pane to choose the size you want. 3. Add the text watermark. Text Watermark: Check Enable, you can add text watermark to selected video clip. You can either set parameters or drag the text on preview screen to set its location. 4. Add the images/video watermark. Image/Video Watermark: Check Enable, you can add images or videos as watermark onto selected video file. The location can also be set by dragging on the preview screen. 5. Add Effect Effect: Under Effect tab, you can add special effect and other special effects like Simple Gauss Blur, Flip Color, Invert, Aged Film to your source video. In Color Control section, you can correct color by adjusting brightness, contrast, and saturation. You can also tick off “Deinterlacing” to keep good image quality. 6. Replace the audio of the original videos to put your own audio on it. Audio Editor: You can either replace/remove original audio, or set audio fade in/out effects. 7. Insert *.srt or *.ass/*.ssa subtitle Subtitle:In this tab, you can add *.srt or *.ass/*.ssa subtitle-files to the video as hard subtitles. More Stream Any Video from Your PC, Mac, Android or iOS Device to Chromecast Plex Tivo Shows Workaround – Importing Tivo files to Plex Encode ISO to Gear VR via Chromecast on Mac 10.11 Can’t Transfer Blu-rays on your New iPod Touch? Convert Protected/Non-protected M4V to Galaxy Tab 4 Nook Copy Frozen (Two-Disc Blu-ray / DVD + Digital Copy) to Kindle Fire HDX Keep Watch iTunes movies via Apple TV 4 Forever Play 4K UHD Videos on 4K HD TV for 4K HD Experience Src Trim, Preview and Share Video Recorded On PS4
Summary: Here is a useful tutorial which will tells you the easy way to get all kinds of movies (Blu-ray, DVD and Video) onto Sony PS4 from USB Flash Drive on Mac for playback smoothly. Sony has released its PlayStation 4 console, the PS4 system opens the door to an incredible journey through immersive new gaming worlds and a deeply connected gaming community, plus it is also an enjoyable experience to play all kinds of movies on Sony PS4 via USB Flash Drive. After received your PS4, you may want to get your favorite Blu-ray, DVD and other downloaded movies onto HDTV via PS4, however, Blu-rays and DVDs are usually hard to be backed up due to region code and disc encryption protection, and your precious BD/DVD discs will be damaged due to repeated use or in other words, in and out the PS4’s Blu-ray/DVD drive over and over again. Moreover, other download movie files may not be supported by PS4. Learn PS4 supported format: Video: MP4, H.264, H.263, DivX, XviD, WMV, MPEG-2 Audio: MP3, AAC, M4A In order to stream movie files (Blu-ray, DVD and Video) to PS4 for playback, you may have to convert them to PS4 playable format (e.g. H.264/MPEG-4). iMedia Converter for Mac is such an all-in-one solution to rip Blu-ray/DVD movies, convert other video content to PS4 for watching on Mac. Overall, it is a Mac Ultimate Converter for PS4 that integrates a blu-ray ripper, a DVD ripper, and a video converter together to rip Blu-ray discs, standard DVDs and convert all kinds of videos to universal video and audio file types with super fast conversion speed and excellent image and sound quality. The Windows version is Pavtube Video Converter Ultimate. Great News! To thanks for your continued support all along our previous site and the new www.multipelife.com, we are holding a 'New Site Special' with fantastic discounts up to 40% off, pay less to get more powerful Pavtube Blu-ray/DVD backup tools! Like us to get 20% off BDMagic(Blu-ray Ripper), 30% off ByteCopy, 40% off DVDAid(DVD Ripper) and 20% off Video Converter Ultimate on Windows/Mac platform: https://www.facebook.com/pavtubefans/app_209569249055691 From: http://bestvideosolution.blogspot.com/2014/05/pavtube-new-official-website.html Learn more special offer: ByteCopy($42) + Video Converter Ultimate($65) = Only $79.9, Save $27.1 Video Converter Ultimate($65) + Vidpie($29) = Only $74.9, Save $19.1 Video Converter Ultimate($65) + DVD Creater($35) = Only $64.9, Save $35.1 The following guide shares with you how to stream movies to Sony PS4 from USB Flash Drive on Mac step-by-step. Step 1. Install and launch the Ultimate Converter for PS4, click "Add Video" to load video files like MTS/M2TS, MKV, VOB, MOV, TOD, TiVo, etc or click on "BD/DVD disc" icon to load movie from DVD and Blu-ray source(Disc, folder, ISO).  Step 2. Click on "Format" boarder to set output format. Here the recommended format is "PSP/PS4 >> PS4 Video(*.720p) MPEG-4(*.mp4)" format, and you can also select other options.
 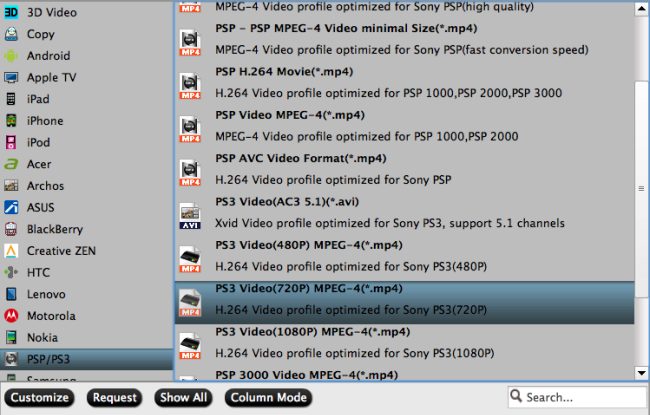 Tips: 1. Click the Subtitle option and you choose the prefer language you want from the drop-down list. The PlayStation 4 (PS4) converter will hard burn the selected subtitle to PlayStation 4 (PS4) video, so that you can enjoy movies with hard-burned subtitles. Then click Audio to select the language like English, French to hear. 2. Click "Settings" to change the video encoder, resolution, frame rate, etc. as you wish. Keep in mind that bitrate higher results in big file size, and lower visible quality loss, and vice versa.
 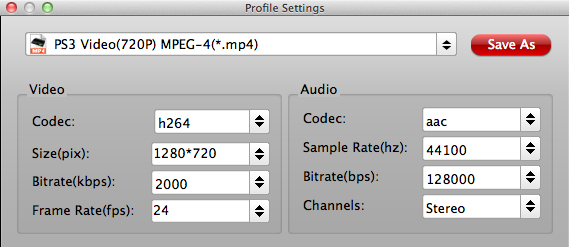 Step 3. Finally click on "Convert" button to start converting movies to MP4 for PS4 streaming and playing. When the conversion finished, you can copy the converted movies to USB Flash Drive, and then you can follow the steps below to play movies: Insert USB Flash Drive into USB port, turn PS4 on and then go to the main menu, select “Video” and find your USB Flash Drive, select “Display All” to see the video files that exists on your PS4, please choose the file that you want to transfer and press the triangle button, choose “Copy” and confirm the transferring, the movies are transferred to your PS4 hard drive, and then you can play movies on HDTV via PS4 from USB Flash Drive without problems. We hope this short article will bring some new multimedia life to your PlayStation 4 (PS4) console. More Cast DVD Movies to Google Chromecast 2 HDMI Dongle Add/Upload Blu-ray files to Dropbox for Playing Rip Blu-ray to Audio files for Storing in iPod Touch 6 When Travelling Use Gear VR to watch 3D Blu-ray movies on Galaxy Note Pavtube Mac Products Upgrade Support for Mac OS X El Capitan Put/Transfer TiVo video files to Apple TV 3 for watching on Mac Put iTunes Videos to Sony PlayStation 4 for Playback Effortlessly Mac OS X El Capitan Required System Requirements and Supported Mac Models Src How to stream movies to Sony PS4 from USB Flash Drive